

Saturday, 29 October 2011
Sassy Studio Designs' Ornament Challenge
This month the Simply Sassy theme is "Ornaments". The brief was that we could get as creative as you
want here... whatever you like as long as there is a holiday bauble on your
creation somewhere. Also remember that you MUST use a Sassy Studio
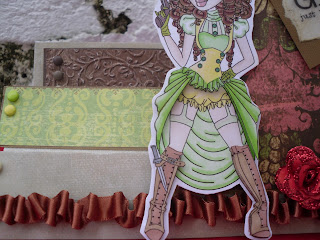
Designs image for this challenge. I used one of the images that i had from taking part in the progressive relay recently. It took me ages colouring Steampunk Vivian as she is so detailed. I backed the image onto a paper with Baubles hanging down and placed gems on her decoupaged hat, and glossy accents to her decoupaged boots to make them extra shiny and fab! Details of the challenge can be found at Sassy Studio designs christmas challenge. My entry is below - hope you like her - thanks for looking x

Thursday, 27 October 2011
Yay! My own stamp!!!!

Congratulations Kate!!!!!


Above is a card for a work collegue that my work collegues all signed to say Good Luck to Kate in her new job, - i will miss you Kate x
Wedding Anniversary card
I was asked if i could rustle up a Wedding Anniversary card, at short notice and i spent 3and a half hours doing the following card!


Congratulations on your new job!


2 year old birthday card


I have to love my friend Kate, she is always behind on her cards! I had a message over the weekend - Could i do a card for her God-daughter, for her 2nd birthday. I used a fav image of mine and made a stepper card, i used pastel colours and layered up the ballon and printed off various sizes of ballons and used some craft wire (thanks for the idea Paula). Teamed this with some paper and ribbon to hide the wires. I added a mirrored number 2 on one layer and the sentiment to the front. I amde a box for the card as it was so deep it would never fit into a standard envolope.
Sunday, 23 October 2011
Celebrating 500 - Sassy Steampunk Progressive Challenge #4
Well I have done it!!!!! I have completed the 4th and final challenge to complete the Sassy Steampunk ralley. I am very proud of myself to be honest as it was aginst all odds, and i must admit to putting a number of household chores to the side while i worked on my cards!!!! But i have loved every minuite of it. I love the images that we were given to work with and i am very grateful for being given the chance to use these images. Huge thatnks to all at Sassy Studios (http://sassystudiodesigns.blogspot.com) for making this possible and for their amazing generosity as these are fantastic images that i will be using for many cards to come!!!
For this card i wanted to use a shaped card as so far i have loved the image so much that i had not given much thought to putting it onto a shaped card as i thought this might distract from the image. I love stepper cards as i always think they stand out form all other cards on a shelf. Plus i love the idea that my card will be sitting on a mantle as a work of art - even if only for a few days!
So stepper card decided, i set about with the colours and backing papers, I love the autumn colours on this card on this card i have tried to incorporate a number of different textures and materials but without making the card look messy or disorganised.
I used different materials for the backing of the panels, i also embossing and different papers from the same pack, using coloured brads to match. When doing the embossed panel i realised that i had embossed the paper upside down, i turned it around and re-did the embossing. The paper started to break up a bit and looked a bit worn but i feel that this just added to the texture of the card. To try to add some different dimensions to the card i set the panels in different positions on the card. I hand made some flowers, and used some ribbon that i was given as part of a craft goodie bag for my birthday from my best mate (and crafting buddy) Paula Dunn.
I coloured Vivian with promarkers and a touch of gel pen in white (i love images like Vivian, they give me lots of opportunities to play with shading). I decoupaged Vivians hat and skirt for added dimension. I completed the card and then realised that i haven't put a sentiment onto it!!! As i am a girl at heart myself and i have loved making the card i thought that the sentiment that i used was perfect. I made a tag as it is not something i have used before but somehow circular sentiments just dont seem to suit Steampunk Vivian. I used my distress ink on the sentiment and in my haste i smudged the ink that printed the sentiment, i thought this improved the rustic look and carried on regardless.
I dont think i have ever written so much about a card i have done which just goes to show how much i loved making it as i could go on forever! So to the pictures .....
This is a picture of my dining table which i take over when card making and the basis of my card
 Here is a picture of me trying my layout in my head on paper so to speak!
 I tried to take a picture of the materials that i used under the papers to show the textures.

The final result.....


Thanks for looking!!!!!
For this card i wanted to use a shaped card as so far i have loved the image so much that i had not given much thought to putting it onto a shaped card as i thought this might distract from the image. I love stepper cards as i always think they stand out form all other cards on a shelf. Plus i love the idea that my card will be sitting on a mantle as a work of art - even if only for a few days!
So stepper card decided, i set about with the colours and backing papers, I love the autumn colours on this card on this card i have tried to incorporate a number of different textures and materials but without making the card look messy or disorganised.
I used different materials for the backing of the panels, i also embossing and different papers from the same pack, using coloured brads to match. When doing the embossed panel i realised that i had embossed the paper upside down, i turned it around and re-did the embossing. The paper started to break up a bit and looked a bit worn but i feel that this just added to the texture of the card. To try to add some different dimensions to the card i set the panels in different positions on the card. I hand made some flowers, and used some ribbon that i was given as part of a craft goodie bag for my birthday from my best mate (and crafting buddy) Paula Dunn.
I coloured Vivian with promarkers and a touch of gel pen in white (i love images like Vivian, they give me lots of opportunities to play with shading). I decoupaged Vivians hat and skirt for added dimension. I completed the card and then realised that i haven't put a sentiment onto it!!! As i am a girl at heart myself and i have loved making the card i thought that the sentiment that i used was perfect. I made a tag as it is not something i have used before but somehow circular sentiments just dont seem to suit Steampunk Vivian. I used my distress ink on the sentiment and in my haste i smudged the ink that printed the sentiment, i thought this improved the rustic look and carried on regardless.
I dont think i have ever written so much about a card i have done which just goes to show how much i loved making it as i could go on forever! So to the pictures .....
This is a picture of my dining table which i take over when card making and the basis of my card


The final result.....

Very distressed sentiment!

Hand made flowers with co-ordinating glitter.


Lastly the poor spider that was wobbled around while i tried to take a good picture in natural light!

Thanks for looking!!!!!
Thursday, 20 October 2011
Sassy Studio progressive challenge no.3!
Tonight i have made number 3 in the progressive challenge to create cards using the images given using the theme advised. For the third part of the challenge i was lucky enough to get an image of Steampunk Victoria. 39 people participated in the original challenge which dropped to 35 for the 2nd challenge, well here we go for the 3rd challenge
For this challenge i needed to use Steampunk Victoria to create a victorian or vintage creation.
For the challenge i printed off a paper that i have had on file for some time now, and christened my Tim Holtz disress pad, i have never used the ink with a pad before but i think it came out well for a first attempt! I used 'old paper' ink and used it for the base card and to colour the star that i printed a sentiment onto.
 I also used a Tim Holtz die cut that i bought a while ago, i simply had to have it and then never used it as i could never quite position it onto a card to look right. I decided that this was the idea opportunity to use it on a card.
 I have started to pick my papers etc first prior to making the card and putting it all together and then colouring my image in as this way it all matches. I did consider making this card into a christmas card but felt that as Victoria was holding a gun i would go for a batman and robin theme and do a star shape from the gun. Promarkers were used to colour Victoria in and i also used promarkers to colour in some white flowers that i had bought, no hand made pics on this card i am afraid. Too tired!

Card finished i took a final photo............. but hang on - can you spot the difference between the next 2 pictures?????

 In my haste to finish my card, i had forgotten to colour Steampunk Victoria's eyes!
 I have really enjoyed the last few days using the images that i have been given by Sassy Studios, and i am very gratefull to all at Sassy Studios for being given these images to use for this challenge. I love the images and the cards that are on the Sassy Studio blog: http://sassystudiodesigns.blogspot.com/ and thank you for the lovely comments that you have been ginig me for the cards i have made. My husband is the only one who really gets to see them and to be honest he says they look good but i dont think he really has too much of an interest in my cards! That said - i think he quite likes the Steampunk images!!!!!! LOL!! Its really confidence boosting to receive positive feedback and i do really appreciate it.
For this challenge i needed to use Steampunk Victoria to create a victorian or vintage creation.
For the challenge i printed off a paper that i have had on file for some time now, and christened my Tim Holtz disress pad, i have never used the ink with a pad before but i think it came out well for a first attempt! I used 'old paper' ink and used it for the base card and to colour the star that i printed a sentiment onto.


Card finished i took a final photo............. but hang on - can you spot the difference between the next 2 pictures?????


Tuesday, 18 October 2011
Celebrating 500 - Sassy Steampunk Progressive Challenge #2
Hello and welcome to Part 2 of the Sassy Steampunk Progressive Relay!
Tonight i created a project using Steampunk Amelia plus a clock(s) and/or gears! For those who sucessfully complete this challenge we will earn a 3rd free image from this BRAND NEW, never before seen SSD Steampunk collection! After that, there is only one more challenge left in order to finish the relay!
I was not sure about the image when i saw it but after colouring it in i think i like it more than the first image, cant wait to get started on the next image!!!! I coloured this image using my full collection of cool grey promarkers which i love colouring with.

Monday, 17 October 2011
Steampunk Josephine using METAL EMBELLISHMENTS.
Tonight i found an adorable free digital image, with a challenge - the rules go as follows:
Her name is Steampunk Josephine! She is the 1st in a series of FOUR brand new, never before seen Sassy Studio Designs steampunk images! And she is yours, free! In order to get your crafty little hands on images 2, 3, and 4, though, well, you have to play along in our progressive challenge! If you've never participated in a progressive relay it is basically a series of challenges where you must complete one challenge to earn the freebie to play along in the next challenge and so on and so on.
So this is my first attempt at entering a progressive challenge as i have only entered about 2 challenges before this is quite a challenge for me! Anyway i have spent my whole evening ignoring the iorning behind me and made the following card. Hope you like it as much as i enjoyed making it.


I used a metal butterfly, with some wire and metallic split pins.
The image and the challenge was at the following blog: http://sassystudiodesigns.blogspot.com/2011/10/celebrating-500-sassy-steampunk-freebie.html
Congratulations to sassy studio designs for reaching 500 members make that 501!!!!
Monday, 10 October 2011
New cards from the week
I have made it my mission to get all the card i need to get done before my holiday done so that they are all ready any only need posting, the first on my list was my sister (in law) Karen, she is a hairdresser - hense the scissors!

The second on my list was my little niece and Goddaughter Rhianna, who is almost 4!!! Where does the time go!!!!! I am not sure what she is into particularly so i just picked a girly free image that i had to do her card:

As always coloured by pro markers, and on this image i also added some detailing around the image, i have enlarged the picture in the hope that this makes it clearer. Its my first attempt at this style that i learnt from 'Cooper cluttered corner' which can be found at the following blog : http://coopsclutteredcorner.blogspot.com/ i love her style and love my daily fix!
The next card on my list was for my Father in Law, who is a real DIY'er he is never without some tool in his hand! So it had to be a tool related card for him!


I then needed to do a card for a work colleague, who is a fan of strictly come dancing, so i just had to go for the bling and do a sparkly card for her, i feel the sentiment is a bit plain but have struggled to think of a way around this:


I used a whole lot of glitter on this card and added gem stones on her necklace and for her ring, decoupaged up parts of his jacket and her outfit.
I was getting a bit fed up with making cards i had to make by this point so i went for a card using a picture that i just loved and wanted to colour for ages now, i got the image free on the letraset promarker web page as a freebie a while ago to enter into a competition to win pro-markers, i never used the image and so printed it out to do for some light relief, still love the image and i hope the recipient loves it too whoever it ends up being!

Lastly i did a christmas card due to be sent all the way to Australia, the posting date for this is soon and i wanted to get this in the post as soon, so that it gets there in plenty of time. I used a Lilly of the valley image, and inked around the edges with a gold ink. Glossy accents on the holly on the girls hat and pearly drops on the parcel, glitter for the girls scarf for soem extra sparkle. You can see the progress on this card below:

I was planning to put hand made flowers onto this card but decided that this did not look very nice as they looked too big, so the end result looked like....

Subscribe to:
Posts (Atom)